


前言
openstack的Train版本安装测试过程记录
openstack和Kubernetes对比
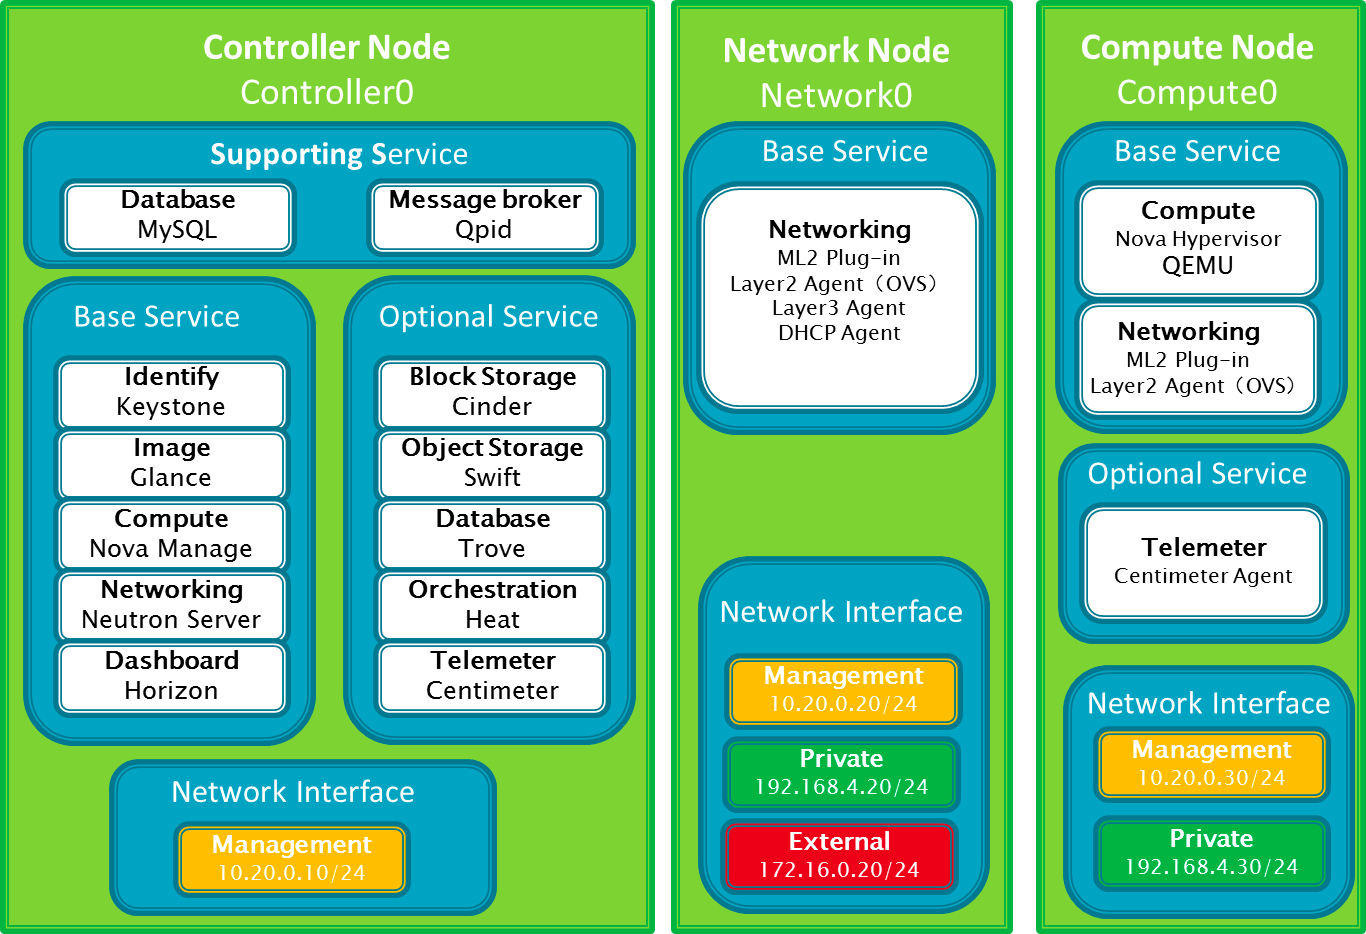
openstack架构说明

准备资源

服务器初始化
#初始化脚本
cd sysinit && sh system_init_v6.sh

#设置主机名
hostnamectl  set-hostname openstack-1
hostnamectl  set-hostname openstack-2
hostnamectl  set-hostname openstack-3

#安装openstack软件源
yum install centos-release-openstack-train -y
yum install https://rdoproject.org/repos/rdo-release.rpm -y
yum upgrade -y
yum install python-openstackclient -y
初始化脚本下载:
设置环境变量
#生成随机密码
openssl rand -hex 10

#在/etc/profile中设置
export ADMIN_PASS=c08393f3ed64cbca17ec
export CINDER_DBPASS=openstack@webzhan.xyz
export CINDER_PASS=c08393f3ed64cbca17ec
export DASH_DBPASS=c08393f3ed64cbca17ec
export DEMO_PASS=c08393f3ed64cbca17ec
export GLANCE_DBPASS=openstack@webzhan.xyz
export GLANCE_PASS=c08393f3ed64cbca17ec
export KEYSTONE_DBPASS=openstack@webzhan.xyz
export METADATA_SECRET=c08393f3ed64cbca17ec
export NEUTRON_DBPASS=openstack@webzhan.xyz
export NEUTRON_PASS=c08393f3ed64cbca17ec
export NOVA_DBPASS=openstack@webzhan.xyz
export NOVA_PASS=c08393f3ed64cbca17ec
export PLACEMENT_PASS=c08393f3ed64cbca17ec
export RABBIT_PASS=c08393f3ed64cbca17ec

#生效
source /etc/profile
安装基础服务
安装 MariaDB
#安装
yum install -y mariadb mariadb-server

#启动
systemctl enable --now mariadb

#初始化
mysql_secure_installation
安装 RabbitMQ
#安装
yum install -y rabbitmq-server

#启动
systemctl enable --now rabbitmq-server

#添加用户
rabbitmqctl add_user openstack $RABBIT_PASS

#授权
rabbitmqctl set_permissions openstack ".*" ".*" ".*"
安装 Memcached
#安装
yum install -y memcached python-memcached

#修改配置,允许外网访问
vim /etc/sysconfig/memcached
OPTIONS=""

#启动
systemctl enable --now memcached
安装 etcd
#安装
yum install -y etcd

#修改配置
vim /etc/etcd/etcd.conf
ETCD_DATA_DIR="/var/lib/etcd/default.etcd"
ETCD_LISTEN_PEER_URLS="http://10.206.0.10:2380"
ETCD_LISTEN_CLIENT_URLS="http://10.206.0.10:2379"
ETCD_NAME="controller"

ETCD_INITIAL_ADVERTISE_PEER_URLS="http://10.206.0.10:2380"
ETCD_ADVERTISE_CLIENT_URLS="http://10.206.0.10:2379"
ETCD_INITIAL_CLUSTER="controller=http://10.206.0.10:2380"
ETCD_INITIAL_CLUSTER_TOKEN="etcd-cluster-01"
ETCD_INITIAL_CLUSTER_STATE="new"

#启动
systemctl enable --now  etcd
安装OpenStack Service
安装 Keystone
# 连接数据库
mysql -uroot -p

# 建库
CREATE DATABASE keystone;
CREATE USER keystone IDENTIFIED BY 'openstack@webzhan.xyz';
GRANT ALL PRIVILEGES ON keystone.* TO 'keystone'@'%';
FLUSH PRIVILEGES;

# 安装
yum install -y openstack-keystone httpd mod_wsgi

# 抱错安装
yum install -y  qpid-proton-c-0.26.0-2.el7.x86_64

# 配置
vim /etc/keystone/keystone.conf
[database]
connection = mysql+pymysql://keystone:openstack%40webzhan.xyz@openstack-1/keystone

[token]
provider = fernet

# 填充数据库
keystone-manage db_sync  keystone

# 初始化Fernet密钥存储库
keystone-manage fernet_setup --keystone-user keystone --keystone-group keystone
keystone-manage credential_setup --keystone-user keystone --keystone-group keystone

# 启动keystone
keystone-manage bootstrap --bootstrap-password $ADMIN_PASS \
  --bootstrap-admin-url http://openstack-1:5000/v3/ \
  --bootstrap-internal-url http://openstack-1:5000/v3/ \
  --bootstrap-public-url http://openstack-1:5000/v3/ \
  --bootstrap-region-id RegionOne

# 配置httpd
vim /etc/httpd/conf/httpd.conf
ServerName openstack-1

# 建立软连接
ln -s /usr/share/keystone/wsgi-keystone.conf /etc/httpd/conf.d/

# 启动httpd
systemctl enable --now httpd

# 三台服务器更新环境变量
export OS_USERNAME=admin
export OS_PASSWORD=$ADMIN_PASS
export OS_PROJECT_NAME=admin
export OS_USER_DOMAIN_NAME=Default
export OS_PROJECT_DOMAIN_NAME=Default
export OS_AUTH_URL=http://openstack-1:5000/v3

# 三台服务器使环境变量生效
source /etc/profile

# 以下继续在 openstack-1 执行
# 创建默认 domain
openstack domain create --description "An Example Domain" example

# 创建service 项目
openstack project create --domain default --description "Service Project" service

# 创建myproject project
openstack project create --domain default --description "Demo Project" myproject

# myuser 用户,密码设置123456
openstack user create --domain default --password-prompt myuser

# 创建myrole权限
openstack role create myrole

# 把myrole权限加入到myproject和myuser中
openstack role add --project myproject --user myuser myrole

# 验证
unset OS_AUTH_URL OS_PASSWORD
openstack --os-auth-url http://openstack-1:5000/v3 \
  --os-project-domain-name Default --os-user-domain-name Default \
  --os-project-name admin --os-username admin token issue

# 验证myproject
openstack --os-auth-url http://openstack-1:5000/v3 \
  --os-project-domain-name Default --os-user-domain-name Default \
  --os-project-name myproject --os-username myuser token issue

# 创建 admin-openrc 文件
export OS_USERNAME=admin
export OS_PASSWORD=$ADMIN_PASS
export OS_PROJECT_NAME=admin
export OS_USER_DOMAIN_NAME=Default
export OS_PROJECT_DOMAIN_NAME=Default
export OS_AUTH_URL=http://openstack-1:5000/v3
export OS_IDENTITY_API_VERSION=3

# 创建 demo-openrc 文件
export OS_PROJECT_DOMAIN_NAME=Default
export OS_USER_DOMAIN_NAME=Default
export OS_PROJECT_NAME=myproject
export OS_USERNAME=myuser
export OS_PASSWORD=123456
export OS_AUTH_URL=http://openstack-1:5000/v3
export OS_IDENTITY_API_VERSION=3
export OS_IMAGE_API_VERSION=2

# 使之生效
. admin-openrc

# 请求认证 token
openstack token issue
安装 Glance
# 连接数据库
mysql -uroot -p

# 创建 mysql 用户及库
CREATE DATABASE glance;
CREATE USER glance IDENTIFIED BY 'openstack@webzhan.xyz';
GRANT ALL PRIVILEGES ON glance.* TO 'glance'@'%';
FLUSH PRIVILEGES;

# 创建 glance 用户, 密码为上面的 GLANCE_PASS
openstack user create --domain default --password-prompt glance

# 为 glance 用户添加 admin 权限
openstack role add --project service --user glance admin

# 创建 glance service
openstack service create --name glance --description "OpenStack Image" image

# 创建 Image service API endpoints
openstack endpoint create --region RegionOne image public http://openstack-1:9292
openstack endpoint create --region RegionOne image internal http://openstack-1:9292
openstack endpoint create --region RegionOne image admin http://openstack-1:9292

# 安装 glance 组件:
yum install -y openstack-glance

# 修改 /etc/glance/glance-api.conf 文件:
[database]
connection = mysql+pymysql://glance:openstack%40webzhan.xyz@openstack-1/glance

[keystone_authtoken]
www_authenticate_uri  = http://openstack-1:5000
auth_url = http://openstack-1:5000
memcached_servers = openstack-1:11211
auth_type = password
project_domain_name = Default
user_domain_name = Default
project_name = service
username = glance
password = c08393f3ed64cbca17ec

[paste_deploy]
flavor = keystone

[glance_store]
stores = file,http
default_store = file
filesystem_store_datadir = /var/lib/glance/images/

# 初始化数据库
glance-manage db_sync glance

# 启动 Glance 服务,如果启动失败,见最后FAQ,应该是权限问题。
systemctl enable  --now openstack-glance-api

# 验证
wget https://launchpad.net/cirros/trunk/0.3.0/+download/cirros-0.3.0-x86_64-disk.img
lsof -i:9292
openstack image create "cirros" --file cirros-0.3.0-x86_64-disk.img --disk-format qcow2 --container-format bare --public
openstack image list
安装 Placement
# 连接数据库
mysql -uroot -p

# 创建 mysql 库和用户
CREATE DATABASE placement;
CREATE USER placement IDENTIFIED BY 'openstack@webzhan.xyz';
GRANT ALL PRIVILEGES ON placement.* TO 'placement'@'%';
FLUSH PRIVILEGES;

# 创建用户,密码是上面的 PLACEMENT_PASS
openstack user create --domain default --password-prompt placement

# 添加 placement service
openstack role add --project service --user placement admin

# 创建Placement API entry:
openstack service create --name placement --description "Placement API" placement

# 创建 Placement API service endpoints
openstack endpoint create --region RegionOne placement public http://openstack-1:8778
openstack endpoint create --region RegionOne placement internal http://openstack-1:8778
openstack endpoint create --region RegionOne placement admin http://openstack-1:8778

# 安装 Placement 组件
yum install -y openstack-placement-api

# 修改 /etc/placement/placement.conf 文件:
[placement_database]
connection = mysql+pymysql://placement:openstack%40webzhan.xyz@openstack-1/placement

[api]
auth_strategy = keystone

[keystone_authtoken]
auth_url = http://openstack-1:5000/v3
memcached_servers = openstack-1:11211
auth_type = password
project_domain_name = Default
user_domain_name = Default
project_name = service
username = placement
password = c08393f3ed64cbca17ec

# 初始化数据库
placement-manage db sync

# 重启 httpd 服务
systemctl restart httpd

# 验证。出现错误,见FAQ
placement-status upgrade check
pip install osc-placement==2.2.0
openstack --os-placement-api-version 1.2 resource class list --sort-column name
openstack --os-placement-api-version 1.6 trait list --sort-column name
安装 Nova
安装 Nova 控制节点
# 连接数据库
mysql -uroot -p

# 创建 mysql 用户和库
CREATE DATABASE nova_api;
CREATE DATABASE nova;
CREATE DATABASE nova_cell0;
CREATE USER nova IDENTIFIED BY 'openstack@webzhan.xyz';
GRANT ALL PRIVILEGES ON nova_api.* TO 'nova'@'%';
GRANT ALL PRIVILEGES ON nova.* TO 'nova'@'%';
GRANT ALL PRIVILEGES ON nova_cell0.* TO 'nova'@'%';
FLUSH PRIVILEGES;

# 创建 nova 用户,密码是 NOVA_PASS
openstack user create --domain default --password-prompt nova

# 为 nova 添加 admin 权限:
openstack role add --project service --user nova admin

# 创建 nova service entity
openstack service create --name nova --description "OpenStack Compute" compute

# 创建 Compute API service endpoints
openstack endpoint create --region RegionOne compute public http://openstack-1:8774/v2.1
openstack endpoint create --region RegionOne compute internal http://openstack-1:8774/v2.1
openstack endpoint create --region RegionOne compute admin http://openstack-1:8774/v2.1

# 安装 nova
yum install -y openstack-nova-api openstack-nova-conductor openstack-nova-novncproxy openstack-nova-scheduler

# 修改 /etc/nova/nova.conf 文件
[DEFAULT]
enabled_apis=osapi_compute,metadata
block_device_allocate_retries=300
block_device_allocate_retries_interval=3


[api_database]
connection = mysql+pymysql://nova:openstack%40webzhan.xyz@openstack-1/nova_api

[database]
connection = mysql+pymysql://nova:openstack%40webzhan.xyz@openstack-1/nova

[DEFAULT]
transport_url=rabbit://openstack:c08393f3ed64cbca17ec@openstack-1:5672/

[api]
auth_strategy = keystone

[keystone_authtoken]
www_authenticate_uri = http://openstack-1:5000/
auth_url = http://openstack-1:5000/
memcached_servers = openstack-1:11211
auth_type = password
project_domain_name = Default
user_domain_name = Default
project_name = service
username = nova
password = c08393f3ed64cbca17ec

[DEFAULT]
my_ip=10.206.0.10

[DEFAULT]
use_neutron = true
firewall_driver = nova.virt.firewall.NoopFirewallDriver

[vnc]
enabled = true
server_listen = $my_ip
server_proxyclient_address = $my_ip

[glance]
api_servers=http://openstack-1:9292

[oslo_concurrency]
lock_path = /var/lib/nova/tmp

[placement]
region_name = RegionOne
project_domain_name = Default
project_name = service
auth_type = password
user_domain_name = Default
auth_url = http://openstack-1:5000/v3
username = placement
password = c08393f3ed64cbca17ec

# 初始化数据库
nova-manage api_db sync

# 注册 cell0 数据库
nova-manage cell_v2 map_cell0

# 注册 cell1 数据库
nova-manage cell_v2 create_cell --name=cell1 --verbose

# 填充 nove 数据库
nova-manage db sync

# 验证 cell0 和 cell1 是否被注册了
nova-manage cell_v2 list_cells

# 启动 nova
systemctl enable --now openstack-nova-api openstack-nova-scheduler openstack-nova-conductor openstack-nova-novncproxy

# 检查更新
nova-status upgrade check
安装 Nova 计算节点
# 安装
yum install -y qpid-proton-c-0.26.0-2.el7.x86_64
yum install -y openstack-nova-compute

# 修改 /etc/nova/nova.conf 文件,注意my_ip
[DEFAULT]
enabled_apis = osapi_compute,metadata
block_device_allocate_retries=300
block_device_allocate_retries_interval=3

[DEFAULT]
transport_url=rabbit://openstack:c08393f3ed64cbca17ec@openstack-1

[api]
auth_strategy = keystone

[keystone_authtoken]
www_authenticate_uri = http://openstack-1:5000/
auth_url = http://openstack-1:5000/
memcached_servers = openstack-1:11211
auth_type = password
project_domain_name = Default
user_domain_name = Default
project_name = service
username = nova
password = c08393f3ed64cbca17ec

[DEFAULT]
my_ip=10.206.0.6

[DEFAULT]
use_neutron = true
firewall_driver = nova.virt.firewall.NoopFirewallDriver

[vnc]
enabled = true
server_listen = 0.0.0.0
server_proxyclient_address = $my_ip
novncproxy_base_url = http://openstack-1:6080/vnc_auto.html

[glance]
api_servers=http://openstack-1:9292

[oslo_concurrency]
lock_path = /var/lib/nova/tmp

[placement]
region_name = RegionOne
project_domain_name = Default
project_name = service
auth_type = password
user_domain_name = Default
auth_url = http://openstack-1:5000/v3
username = placement
password = c08393f3ed64cbca17ec

# 执行
egrep -c '(vmx|svm)' /proc/cpuinfo

# 如果返回了 0 ,还需要配置:
[libvirt]
virt_type=qemu

# 启动 Nova 计算节点:
systemctl enable --now libvirtd openstack-nova-compute

# 查看有哪些计算节点
openstack compute service list --service nova-compute

# 发现计算节点,每次加入新节点后,都要执行 nova-manage命令。
nova-manage cell_v2 discover_hosts --verbose

# 验证 Nova 安装
openstack catalog list
openstack image list
nova-status upgrade check
安装 Neutron
安装 Neutron 控制节点
# 连接数据库
mysql -uroot -p

# 创建 mysql 库和用户
CREATE DATABASE neutron;
CREATE USER neutron IDENTIFIED BY 'openstack@webzhan.xyz';
GRANT ALL PRIVILEGES ON neutron.* TO 'neutron'@'%';
FLUSH PRIVILEGES;

# 创建 neutron 用户,使用 NEUTRON_PASS 为密码
openstack user create --domain default --password-prompt neutron

# 为 neutron 用户添加 admin 权限
openstack role add --project service --user neutron admin

# 创建 neutron service entity
openstack service create --name neutron --description "OpenStack Networking" network

# 创建 Networking service API endpoints
openstack endpoint create --region RegionOne network public http://openstack-1:9696
openstack endpoint create --region RegionOne network internal http://openstack-1:9696
openstack endpoint create --region RegionOne network admin http://openstack-1:9696

# 这里配置网络有两种选项,下面来部署比较简单的
yum install  -y openstack-neutron openstack-neutron-ml2 openstack-neutron-linuxbridge ebtables

# 修改 /etc/neutron/neutron.conf 文件
[database]
connection = mysql+pymysql://neutron:openstack%40webzhan.xyz@openstack-1/neutron

[DEFAULT]
core_plugin = ml2
service_plugins =

[DEFAULT]
transport_url=rabbit://openstack:c08393f3ed64cbca17ec@openstack-1

[DEFAULT]
auth_strategy = keystone

[keystone_authtoken]
www_authenticate_uri = http://openstack-1:5000
auth_url = http://openstack-1:5000
memcached_servers = openstack-1:11211
auth_type = password
project_domain_name = default
user_domain_name = default
project_name = service
username = neutron
password = c08393f3ed64cbca17ec

[DEFAULT]
notify_nova_on_port_status_changes = true
notify_nova_on_port_data_changes = true

[nova]
auth_url = http://openstack-1:5000
auth_type = password
project_domain_name = default
user_domain_name = default
region_name = RegionOne
project_name = service
username = nova
password = c08393f3ed64cbca17ec

[oslo_concurrency]
lock_path = /var/lib/neutron/tmp

# 修改 /etc/neutron/plugins/ml2/ml2_conf.ini 文件,添加以下内容
[ml2]
type_drivers = flat,vlan
tenant_network_types =
mechanism_drivers = linuxbridge
extension_drivers = port_security

[ml2_type_flat]
flat_networks = provider

[securitygroup]
enable_ipset = true

# 修改 /etc/neutron/plugins/ml2/linuxbridge_agent.ini 文件,添加以下内容
## 注意网卡名称
[linux_bridge]
physical_interface_mappings = provider:eth0

[vxlan]
enable_vxlan = false

[securitygroup]
enable_security_group = true
firewall_driver = neutron.agent.linux.iptables_firewall.IptablesFirewallDriver

# 修改 /etc/neutron/dhcp_agent.ini 文件,加入以下配置
[DEFAULT]
interface_driver = linuxbridge
dhcp_driver = neutron.agent.linux.dhcp.Dnsmasq
enable_isolated_metadata = true

# 修改 /etc/neutron/metadata_agent.ini 文件,加入以下内容
[DEFAULT]
nova_metadata_host = openstack-1
metadata_proxy_shared_secret = c08393f3ed64cbca17ec

# 修改 /etc/nova/nova.conf 文件,加入以下内容
[neutron]
auth_url = http://openstack-1:5000
auth_type = password
project_domain_name = default
user_domain_name = default
region_name = RegionOne
project_name = service
username = neutron
password = c08393f3ed64cbca17ec
service_metadata_proxy = true
metadata_proxy_shared_secret = c08393f3ed64cbca17ec

# 启动 Neutron
ln -s /etc/neutron/plugins/ml2/ml2_conf.ini /etc/neutron/plugin.ini
neutron-db-manage --config-file /etc/neutron/neutron.conf --config-file /etc/neutron/plugins/ml2/ml2_conf.ini upgrade head

systemctl restart openstack-nova-api

systemctl enable --now neutron-server neutron-linuxbridge-agent neutron-dhcp-agent neutron-metadata-agent

# 创建网络
openstack network create  --share --external --provider-physical-network provider --provider-network-type flat provider

# 创建子网
openstack subnet create --network provider --allocation-pool start=10.206.0.20,end=10.206.0.50 --dns-nameserver 183.60.83.19 --gateway 10.206.0.1 --subnet-range 10.206.0.0/20 provider
安装 Neutron 计算节点
# 安装软件
yum install -y openstack-neutron-linuxbridge ebtables ipset

# 修改 /etc/neutron/neutron.conf 配置文件
[DEFAULT]
transport_url=rabbit://openstack:c08393f3ed64cbca17ec@openstack-1

[DEFAULT]
auth_strategy = keystone

[keystone_authtoken]
www_authenticate_uri = http://openstack-1:5000
auth_url = http://openstack-1:5000
memcached_servers = openstack-1:11211
auth_type = password
project_domain_name = default
user_domain_name = default
project_name = service
username = neutron
password = c08393f3ed64cbca17ec

[oslo_concurrency]
lock_path = /var/lib/neutron/tmp

# 修改 /etc/neutron/plugins/ml2/linuxbridge_agent.ini 文件
## 注意网卡名称
[linux_bridge]
physical_interface_mappings = provider:eth0

[vxlan]
enable_vxlan = false

[securitygroup]
enable_security_group = true
firewall_driver = neutron.agent.linux.iptables_firewall.IptablesFirewallDriver

# 修改 /etc/nova/nova.conf 文件
[neutron]
url = http://openstack-1:9696
auth_url = http://openstack-1:5000
auth_type = password
project_domain_name = default
user_domain_name = default
region_name = RegionOne
project_name = service
username = neutron
password = c08393f3ed64cbca17ec

# 重启计算服务
systemctl restart openstack-nova-compute

# 启动网络计算服务。启动抱错(网卡名称导致),见FAQ
systemctl enable --now neutron-linuxbridge-agent

# 验证
openstack extension list --network

# 查看网络节点列表
openstack network agent list
安装 CInder
安装 Cinder 控制节点
# 连接数据库
mysql -uroot -p

# 添加 mysql 库和 用户
CREATE DATABASE cinder;
CREATE USER cinder IDENTIFIED BY 'openstack@webzhan.xyz';
GRANT ALL PRIVILEGES ON cinder.* TO 'cinder'@'%';
FLUSH PRIVILEGES;

# 创建 cinder 用户,密码是 CINDER_PASS
openstack user create --domain default --password-prompt cinder

# 为 cinder 用户绑定 admin 权限
openstack role add --project service --user cinder admin

# 创建 cinderv2 and cinderv3 service entities
openstack service create --name cinderv2 --description "OpenStack Block Storage" volumev2
openstack service create --name cinderv3 --description "OpenStack Block Storage" volumev3

# 创建 Block Storage service API endpoints
openstack endpoint create --region RegionOne volumev2 public http://openstack-1:8776/v2/%\(project_id\)s
openstack endpoint create --region RegionOne volumev2 internal http://openstack-1:8776/v2/%\(project_id\)s
openstack endpoint create --region RegionOne volumev2 admin http://openstack-1:8776/v2/%\(project_id\)s

openstack endpoint create --region RegionOne volumev3 public http://openstack-1:8776/v3/%\(project_id\)s
openstack endpoint create --region RegionOne volumev3 internal http://openstack-1:8776/v3/%\(project_id\)s
openstack endpoint create --region RegionOne volumev3 admin http://openstack-1:8776/v3/%\(project_id\)s

# 安装 cinder
yum install -y openstack-cinder

# 修改 /etc/cinder/cinder.conf 配置文件
[database]
connection = mysql+pymysql://cinder:openstack%40webzhan.xyz@openstack-1/cinder

[DEFAULT]
transport_url=rabbit://openstack:c08393f3ed64cbca17ec@openstack-1:5672/
auth_strategy = keystone
my_ip = 10.206.0.10

[keystone_authtoken]
www_authenticate_uri = http://openstack-1:5000
auth_url = http://openstack-1:5000
memcached_servers = openstack-1:11211
auth_type = password
project_domain_name = default
user_domain_name = default
project_name = service
username = cinder
password = c08393f3ed64cbca17ec

[oslo_concurrency]
lock_path = /var/lib/cinder/tmp

# 初始化数据库
cinder-manage db sync

# 配置计算节点使用块储存,在全部节点上修改 /etc/nova/nova.conf
[cinder]
os_region_name = RegionOne

# 重启 nova-api
systemctl restart openstack-nova-api

# 启动块储存控制节点的服务:
systemctl enable --now openstack-cinder-api openstack-cinder-scheduler
安装 Cinder 储存节点
# 实体机采用虚拟卷扩展磁盘,本次采用竞价实例无法添加硬盘,采用下面NFS方式
# 安装软件
yum install -y lvm2 device-mapper-persistent-data

# 启动 lvm
systemctl enable --now lvm2-lvmetad

# 准备几块磁盘,创建pv
pvcreate /dev/sdb
pvcreate /dev/sdc

# 创建 vg:
vgcreate cinder-volumes /dev/sdb /dev/sdc

# 在 /etc/lvm/lvm.conf 中 的 devices 块中添加
filter = [ "a/sdb/", "a/sdc/" "r/.*/"]
# 安装软件
yum -y install nfs-utils rpcbind
# 配置
vim /etc/exports
/data/nfs *(rw,no_root_squash)
# 创建目录
mkdir -p /data/nfs
# 启动
systemctl enable --now nfs rpcbind
# 查看
showmount -e localhost
# 安装 Cinder 储存组件
yum install -y openstack-cinder targetcli python-keystone

# 查看类名
grep 'Nfs'  /usr/lib/python2.7/site-packages/cinder/volume/drivers/nfs.py | grep class

# 修改 /etc/cinder/cinder.conf 配置文件
[database]
connection = mysql+pymysql://cinder:openstack%40webzhan.xyz@openstack-1/cinder

[DEFAULT]
transport_url=rabbit://openstack:c08393f3ed64cbca17ec@openstack-1:5672/
auth_strategy = keystone
glance_api_servers = http://openstack-1:9292
my_ip = 10.206.0.6
enabled_backends = nfs

[keystone_authtoken]
www_authenticate_uri = http://openstack-1:5000
auth_url = http://openstack-1:5000
memcached_servers = openstack-1:11211
auth_type = password
project_domain_name = default
user_domain_name = default
project_name = service
username = cinder
password = c08393f3ed64cbca17ec

[oslo_concurrency]
lock_path = /var/lib/cinder/tmp


[nfs]
volume_backend_name = nfs
volume_driver = cinder.volume.drivers.nfs.NfsDriver
nfs_shares_config=/etc/cinder/nfs_shares
nfs_mount_point_base=$state_path/mnt

# 创建nfs配置文件
vim  /etc/cinder/nfs_shares
10.206.0.6:/data/nfs

# 更改权限
chown root:cinder /etc/cinder/nfs_shares
chmod 640 /etc/cinder/nfs_shares

# 启动 Cinder 储存节点
systemctl enable --now openstack-cinder-volume

# 验证,密码 c08393f3ed64cbca17ec
openstack volume service list
安装 Horizon
# 安装软件
yum install -y openstack-dashboard

# 修改 /etc/openstack-dashboard/local_settings 配置文件
OPENSTACK_HOST = "openstack-1"
ALLOWED_HOSTS = ['*']
SESSION_ENGINE = 'django.contrib.sessions.backends.cache'
CACHES = {
    'default': {
         'BACKEND': 'django.core.cache.backends.memcached.MemcachedCache',
         'LOCATION': 'openstack-1:11211',
    }
}

TIME_ZONE = "Asia/Shanghai"

OPENSTACK_NEUTRON_NETWORK = {
    'enable_auto_allocated_network': False,
    'enable_distributed_router': False,
    'enable_fip_topology_check': True,
    'enable_ha_router': False,
    'enable_ipv6': True,
    # TODO(amotoki): Drop OPENSTACK_NEUTRON_NETWORK completely from here.
    # enable_quotas has the different default value here.
    'enable_quotas': False,
    'enable_rbac_policy': True,
    'enable_router': True,
    'enable_lb': False,
    'enable_firewall': False,
    'enable_vpn': False,

    'default_dns_nameservers': [],
    'supported_provider_types': ['*'],
    'segmentation_id_range': {},
    'extra_provider_types': {},
    'supported_vnic_types': ['*'],
    'physical_networks': [],

}


OPENSTACK_KEYSTONE_MULTIDOMAIN_SUPPORT = True
OPENSTACK_API_VERSIONS = {
    "identity": 3,
    "image": 2,
    "volume": 3,
}
OPENSTACK_KEYSTONE_DEFAULT_DOMAIN = "Default"
OPENSTACK_KEYSTONE_DEFAULT_ROLE = "user"

WEBROOT = "/dashboard/"

# 在 /etc/httpd/conf.d/openstack-dashboard.conf 中添加
WSGIApplicationGroup %{GLOBAL}

# 重启 httpd 和 缓存服务:
systemctl restart httpd  memcached

# 在界面上创建一个镜像,镜像需要特殊定制的。然后查看镜像列表:
glance image-list
测试访问
http://openstack-1/dashboard

FAQ
glance启动抱错
#修改systemd配置,注销
vim /lib/systemd/system/openstack-glance-api.service
#Restart=on-failure

# 使生效
systemctl daemon-reload

# 重启
systemctl restart openstack-glance-api

# 报错权限问题,修改后重启成功
chown -R glance:glance /var/log/glance/api.log
Placement报错
# 在 /etc/httpd/conf.d/00-placement-api.conf 中的 <VirtualHost *:8778> 内部加入以下代码:

  <Directory /usr/bin>
    <IfVersion >= 2.4>
      Require all granted
    </IfVersion>
    <IfVersion < 2.4>
      Order allow,deny
      Allow from all
    </IfVersion>
  </Directory>

# 重启 httpd
systemctl restart httpd

# 再次验证
openstack --os-placement-api-version 1.2 resource class list --sort-column name
openstack --os-placement-api-version 1.6 trait list --sort-column name
neutron-linuxbridge-agent 启动抱错
# 查看日志
cat /var/log/neutron/linuxbridge-agent.log
Interface ens192 for physical network provider does not exist. Agent terminated!

# 修改 /etc/neutron/plugins/ml2/linuxbridge_agent.ini
## 网卡接口不对
[linux_bridge]
physical_interface_mappings = provider:eth0

# 重启服务
 systemctl restart neutron-linuxbridge-agent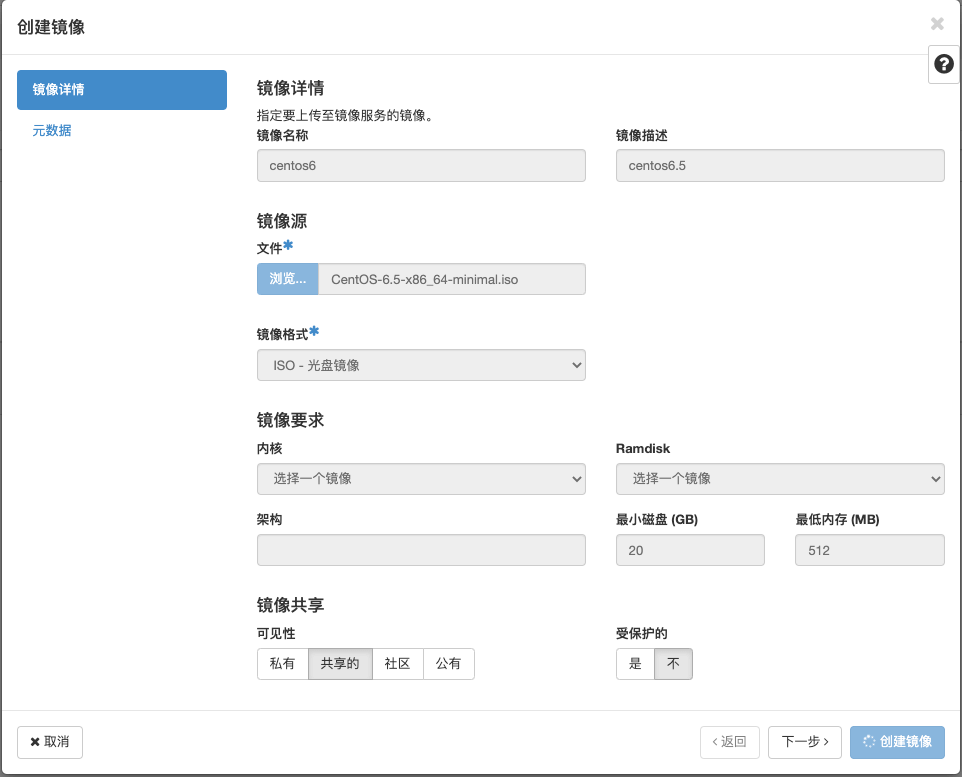

这篇文章写的真不错,真详细,点个赞。